Application Package and Deployment
An application package is how you tell Vespa what your application looks like. It contains your schemas, configuration files, machine learning models, and everything Vespa needs to set up and run your application. Understanding how application packages work is essential for managing Vespa applications in development and production.
In this chapter, we explore the structure of application packages, the purpose of each component, and how deployment works.
What is an Application Package
An application package is a directory with a specific structure containing all your application configuration. When you deploy this package to Vespa, the config server reads it, validates it, and pushes the configuration to all nodes in your system.
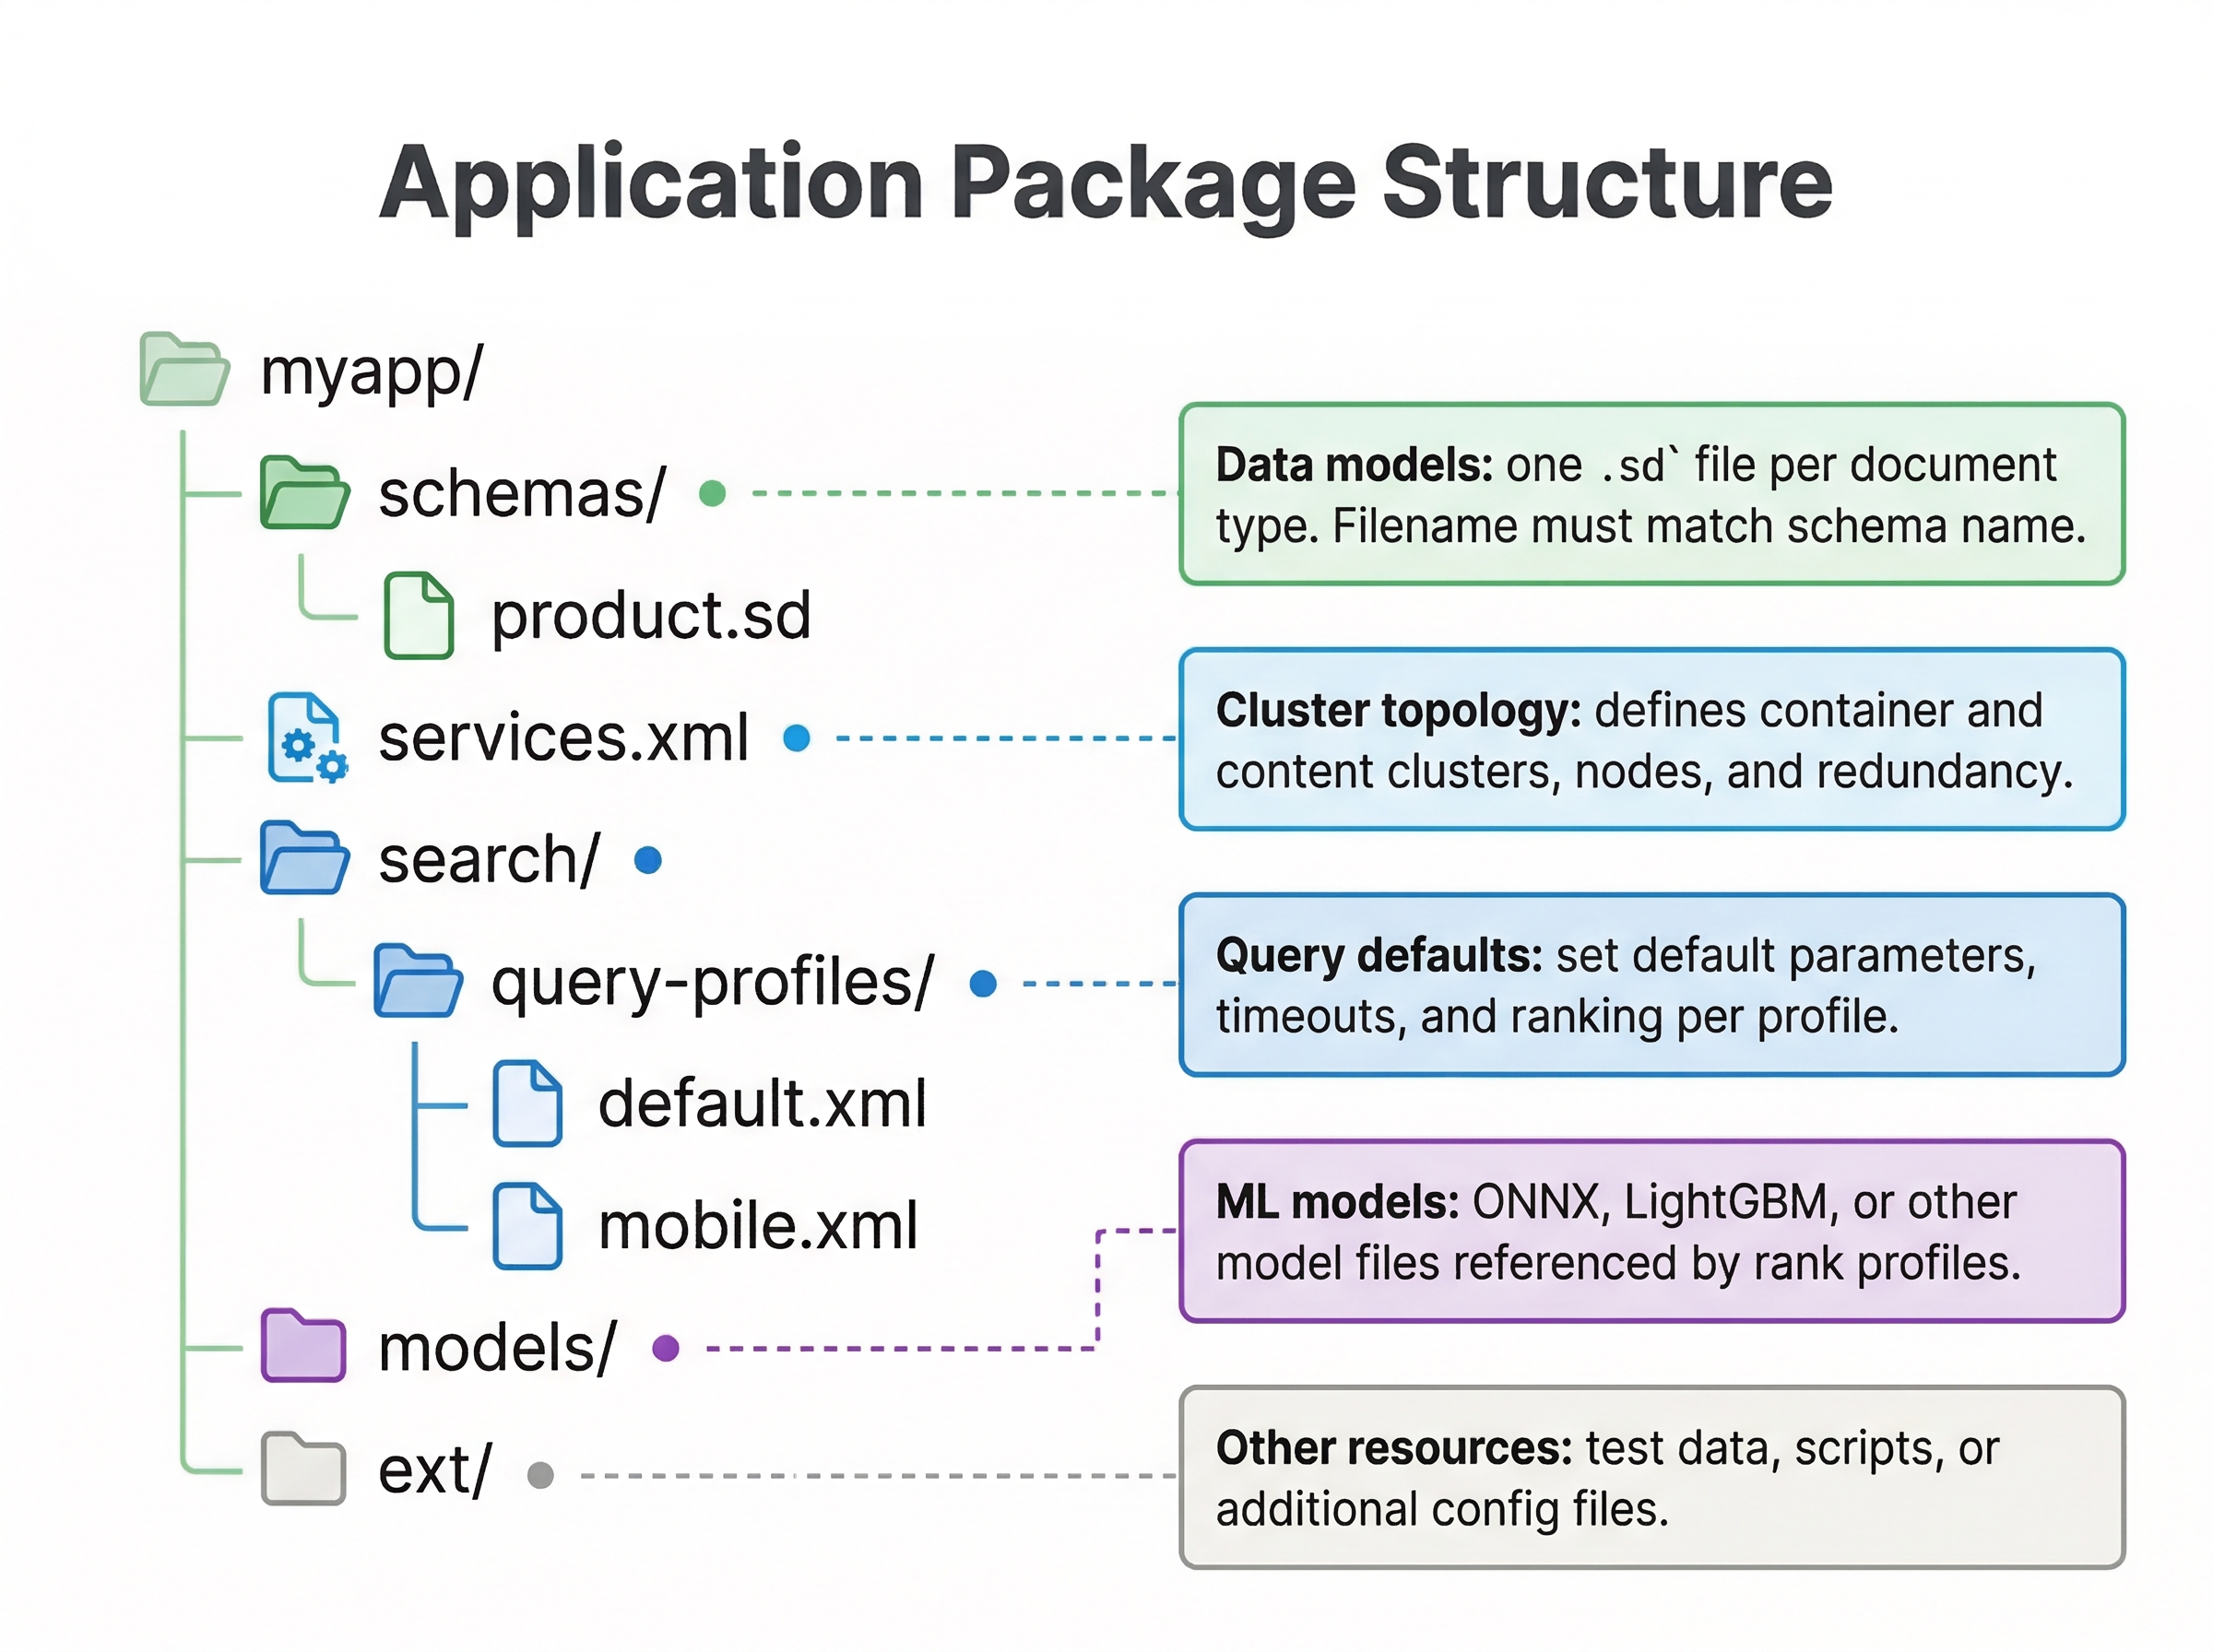
At minimum, an application package contains a services.xml file that defines your cluster topology. Most applications also have a schemas/ directory with schema definitions, and may include other components like ranking models, custom Java code, or component configuration.
Directory Structure
A typical application package looks like this:
my-app/
├── services.xml
├── schemas/
│   ├── product.sd
│   └── review.sd
├── models/
│   └── my_model.onnx
├── components/
│   └── my-component.jar
└── search/
    └── query-profiles/
        └── default.xml
Let's explore what each part does.
services.xml
The services.xml file is the heart of your application package. It defines the topology of your application by specifying what clusters exist, what nodes belong to each cluster, and how they are configured.
A simple services.xml looks like:
<?xml version="1.0" encoding="UTF-8"?>
<services version="1.0">
  <container id="default" version="1.0">
    <search/>
    <document-api/>
  </container>

  <content id="content" version="1.0">
    <redundancy>2</redundancy>
    <documents>
      <document type="product" mode="index"/>
    </documents>
    <nodes>
      <node distribution-key="0" hostalias="node1"/>
      <node distribution-key="1" hostalias="node2"/>
    </nodes>
  </content>
</services>
The <container> section defines stateless container clusters that handle queries and document processing. The <content> section defines stateful content clusters that store and index your data. The <nodes> elements specify which physical or virtual hosts run each service.
schemas Directory
The schemas/ directory contains your schema definition files with the .sd extension. You put one schema per file, named after the document type. If you have a schema for products, you would have schemas/product.sd. The schema files define document structure, field types, indexing instructions, and ranking profiles as we covered in Module 2.
models Directory
If your application uses machine learning models for ranking or other purposes, you place model files in the models/ directory. Vespa supports ONNX models, XGBoost models, LightGBM models, and TensorFlow models. When you reference a model in a ranking expression, Vespa looks for it in this directory.
For example, if you have an ONNX model file my_model.onnx, you can reference it in a ranking profile:
rank-profile ml_ranking {
  onnx-model my_model {
    file: models/my_model.onnx
  }
  first-phase {
    expression: sum(onnx(my_model).output)
  }
}
components Directory
The components/ directory holds custom Java components you have built. If you write custom document processors, searchers, or handlers in Java, you compile them into JAR files and place them here. Vespa loads these components at startup and makes them available to your application.
Custom Components
Vespa supports custom Java components that let you extend the platform's behavior. The main types are:
- Searchers process queries in the container before and after they reach the content cluster. You can use them to rewrite queries, add filters, or post-process results.
- Document processors intercept documents during feeding, letting you enrich, validate, or transform data before it is indexed.
- Handlers expose custom HTTP endpoints on the container, useful for building application-specific APIs.
- Renderers customize the output format of search results.
You compile these components into JAR files and place them in the components/ directory. To wire a component into your application, you declare it in services.xml. Here is an example of a custom searcher added to the default search chain:
<container id="default" version="1.0">
  <search>
    <chain id="default" inherits="vespa">
      <searcher id="com.example.MySearcher" bundle="my-bundle"/>
    </chain>
  </search>
  <document-api/>
</container>
The inherits="vespa" attribute ensures your custom chain includes all of Vespa's built-in searchers. Your searcher is added on top, so you get the standard query processing pipeline plus your custom logic.
Vespa uses dependency injection for component configuration. You define a .def config file that declares your configuration parameters, and Vespa generates a typed config class from it. Your component receives this config object in its constructor. When you redeploy with updated configuration, Vespa automatically reconstructs your components with the new values. You do not need to handle reloading yourself.
Most applications do not need custom components. Vespa's built-in features, including rank expressions, query profiles, and document processing instructions in schemas, cover common use cases. Consider custom components only when you need logic that cannot be expressed through configuration alone.
search Directory
The search/ directory can contain query profiles and other search-related configuration. Query profiles let you define default query parameters and create named profiles for different query types.
Embedding Configuration
If your application uses vector search, you need an embedder to convert text into vector representations. Vespa lets you run embedding models directly inside the container, so you do not need a separate service for this.
Embedders are configured as <component> elements inside the <container> section of services.xml. Here is an example using a Hugging Face model:
<container id="default" version="1.0">
  <component id="my-embedder" type="hugging-face-embedder">
    <transformer-model path="models/model.onnx"/>
    <tokenizer-model path="models/tokenizer.json"/>
  </component>
  <search/>
  <document-api/>
</container>
The model files (model.onnx and tokenizer.json) go in the models/ directory of your application package, just like ranking models. When the container starts, it loads the embedder and makes it available for both indexing and query time.
If your model files are large, bundling them in the application package can make deployments slow. You can use url instead of path to have Vespa download the model at deploy time:
<transformer-model url="https://huggingface.co/my-org/my-model/resolve/main/model.onnx"/>
<tokenizer-model url="https://huggingface.co/my-org/my-model/resolve/main/tokenizer.json"/>
This keeps your application package small while still giving Vespa everything it needs.
Once an embedder is configured, you reference it in your schema's indexing expressions. For example, input title | embed my-embedder tells Vespa to take the title field, pass it through the embedder, and store the resulting vector. We will set this up hands-on in Lab 5 (Module 05), so for now just be aware that this is where embedders live in the application package.
Vespa also exposes ONNX runtime tuning options like onnx-execution-mode and onnx-intraop-threads for controlling how the model runs on your hardware. The defaults work well for most cases, so you typically do not need to touch these unless you are optimizing for throughput on large-scale deployments.
hosts.xml
For self-hosted Vespa deployments, hosts.xml maps logical host aliases to actual hostnames or IP addresses. This file is used when you have multiple physical machines and need to tell Vespa which host runs which service.
A hosts.xml might look like:
<?xml version="1.0" encoding="utf-8" ?>
<hosts>
  <host name="host1.example.com">
    <alias>node1</alias>
  </host>
  <host name="host2.example.com">
    <alias>node2</alias>
  </host>
</hosts>
For Vespa Cloud deployments, you do not need hosts.xml because the cloud platform manages hosts automatically.
deployment.xml
For Vespa Cloud, deployment.xml specifies which environments and regions your application deploys to. You use this to define deployment pipelines from development to production.
A deployment.xml example:
<deployment version="1.0">
  <prod>
    <region>aws-us-east-1c</region>
  </prod>
</deployment>
The Deployment Process
When you run vespa deploy, several things happen. The CLI packages your application directory, uploads it to the config server, and the config server validates the package. It checks that schemas are valid, services.xml is well-formed, and all referenced files exist.
If validation passes, the config server computes the detailed configuration for every node based on your package. It determines which nodes should run which services, how data should be distributed, and what configuration each component needs.
The config server then pushes this configuration to all nodes in your cluster. Container nodes receive configuration about query handling and components. Content nodes receive schema information and indexing instructions. The cluster controller receives topology information.
Each node receives its configuration, applies changes, and reports back to the config server. When all nodes have successfully reconfigured, the deployment completes.
Checking Deployment Status
After deploying, check the status with vespa status. This command queries the config server and reports whether the application is active and all nodes are healthy. If some nodes failed to configure, status will show which ones have problems.
For detailed information, you can check specific endpoints. The config server exposes a status API at port 19071 that shows the current application version and configuration state.
Configuration Reloads
One powerful feature of Vespa is that many configuration changes can be applied without restarting services. When you redeploy with updated schemas or ranking profiles, Vespa reloads the configuration while continuing to serve queries.
Some changes require more work. Adding fields to schemas can be done live. Changing field types requires re-feeding existing documents. Removing fields is usually safe. The config server handles these scenarios and reports if any manual steps are needed.
Validation and Error Handling
If deployment fails, the config server provides error messages explaining what went wrong. Common issues include syntax errors in XML files, invalid schema syntax, missing files referenced in configuration, or type mismatches.
Read error messages carefully. They usually point to the exact file and line number where the problem exists. Fix the issue and redeploy. Your previous application version continues running until a new deployment succeeds, so failed deployments do not break your running application.
Best Practices
Keep your application package in version control. Treat it like source code. Every change should be committed, and deployments should happen from known versions. This makes it easy to roll back if needed and provides an audit trail of changes.
Organize files clearly. Use meaningful names for schemas and models. Document non-obvious configuration choices in comments or separate documentation files.
Test changes in development before pushing to production. Deploy to a test environment, verify everything works, then promote the same package to production.
Keep application packages small. Very large packages take longer to upload and validate. If you have huge models or data files, consider whether they really need to be in the package or could be loaded another way.
Deploying to Different Environments
The same application package can be deployed to local development, self-hosted clusters, or Vespa Cloud. The core structure remains the same. What changes is how you target the deployment.
For local development, use vespa config set target local and deploy to localhost. For self-hosted clusters, configure the CLI with your config server address. For Vespa Cloud, configure your tenant and application names, set up certificates, and target the cloud.
The application package itself does not need to change between environments. Your schemas, ranking profiles, and services.xml work the same everywhere. This consistency makes it easy to develop locally and deploy to production with confidence.
Next Steps
You now understand application package structure and deployment. The next chapter explores how to configure clusters in services.xml for different topologies and resource requirements.
For complete reference on application packages, see the Vespa application packages guide and services.xml reference.